
Tools Mentioned in this page:


Everything in the first four collection of articles of this series was about AI-assisted work — you open a tool, you give it a task, it helps you do it faster. That's valuable. It's also still manual. You still have to be the one who opens the tool and starts the conversation.
This article is about the next level: a workflow that combines AI and automation so that work happens without you actively initiating it. Something triggers. AI processes it. An output appears — a draft, a response, a logged entry — without you having done anything.
That's the difference between AI as a tool you use and AI as infrastructure that runs in your business.
This isn't the most advanced thing you can build. It's the most accessible bridge between where you are now and what operations automation actually looks like. Two concrete workflows, both beginner-safe, both buildable in under an hour, both genuinely useful from the first run.
What you're building — and the concept underneath it
The basic structure of every workflow in this article is the same:
Something happens (a trigger) → AI processes it → Something happens with the output (an action)
The "something happens" without you. You're not there. You don't initiate it. The trigger fires, the AI runs, the output lands wherever you configured it to land.
This is different from the basic automations in (5 Things You Can Automate This Week Without Any Coding), which connected apps directly — form submission → Google Sheet row, no AI in the middle. What you're building here adds intelligence to that structure. The workflow doesn't just move data from one place to another. It reads the data, interprets it, and produces something new with it.
The tool that makes this work: Zapier, specifically with its AI step built in. Zapier's "AI by Zapier" action lets you add an AI processing step anywhere in a workflow — feed it text, give it instructions, get back generated or analyzed output. No separate OpenAI or Claude API key needed. It uses OpenAI's models under the hood and is included in Zapier's free and paid plans.
For more complex use cases later, Zapier MCP (which connects Claude or ChatGPT directly to your apps via Model Context Protocol) is the more powerful option — but it's beyond beginner scope. The built-in "AI by Zapier" step is the right starting point.
Before you start: what you need
Zapier account: Free tier works for testing both workflows. For reliable ongoing operation, you'll need Zapier Starter at $19.99/month (annual) — the free tier limits you to 100 tasks/month and single-step Zaps, which isn't enough for multi-step AI workflows. The workflows below each use 2–3 steps per run.
The apps you're connecting: Both workflows below use Gmail or your email provider. One uses Google Forms or Tally. Have those accounts connected to Zapier before you start — you can connect them during setup but it adds time.
15 minutes of prep: Write out exactly what you want the AI step to do in plain English. What should it read? What should it produce? How long? What tone? Having this written down before you open Zapier means the setup is configuration, not decision-making.
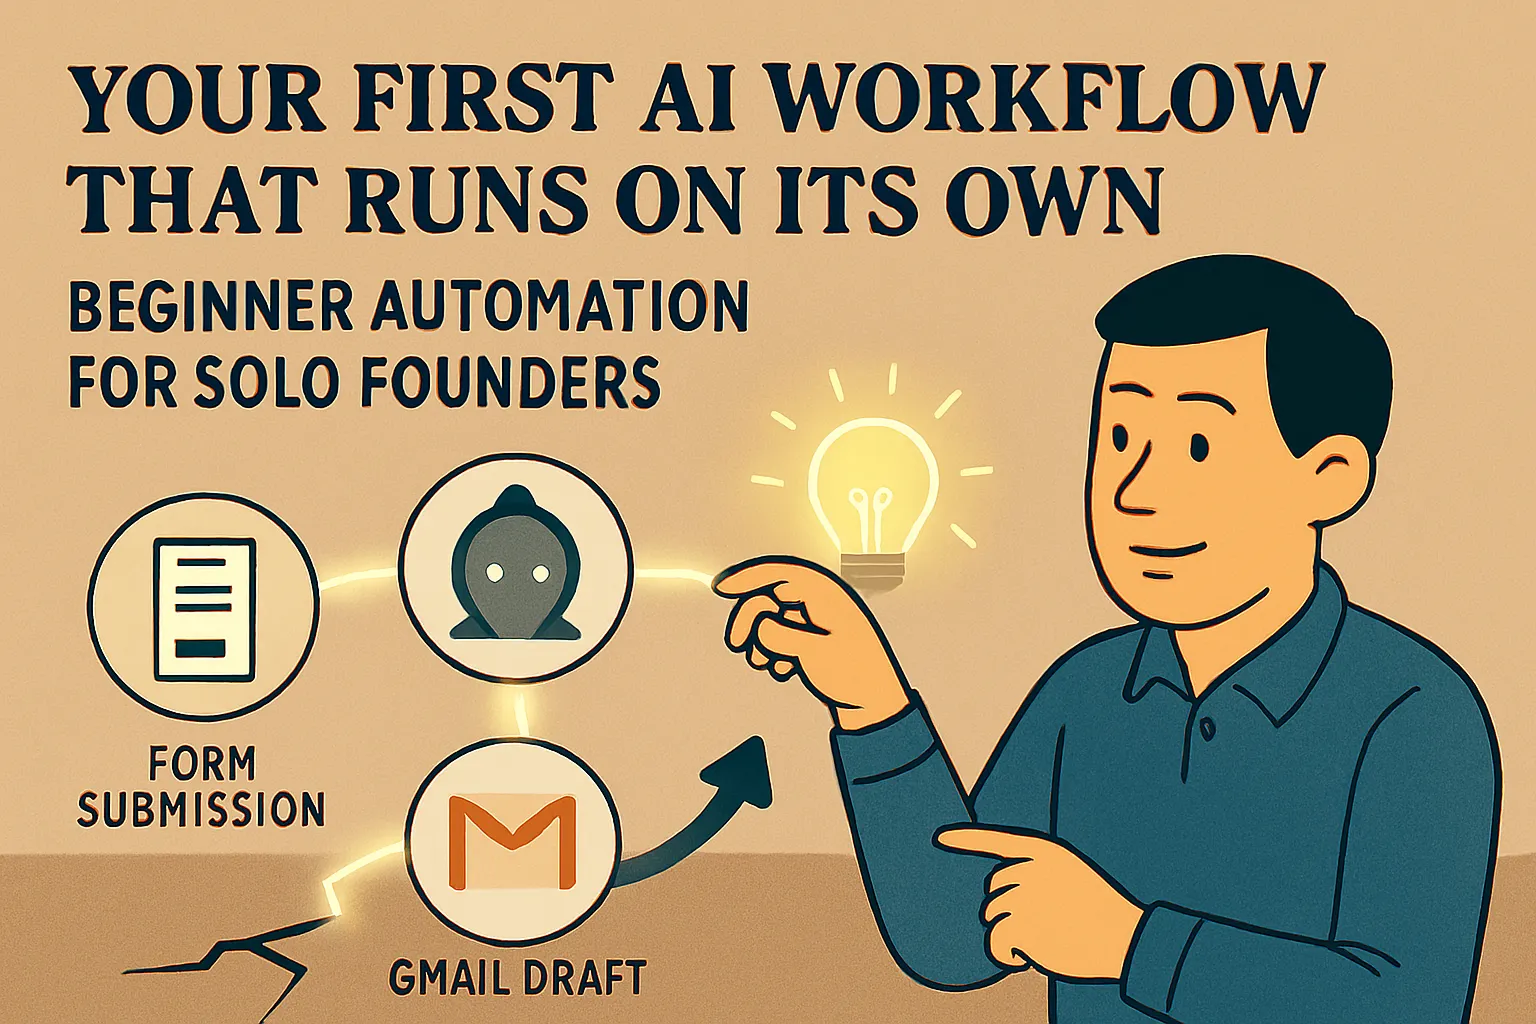
Workflow 1: New enquiry → AI-drafted personalized response → saves to Gmail drafts
What this does: Every time someone submits your contact form, Zapier triggers, feeds their message to an AI step with your instructions, generates a personalized first-response draft, and saves it directly to your Gmail drafts folder. You open Gmail, find the draft, review it, and send it in under two minutes.
Why this one first: The lead response time problem — covered in (5 Things You Can Automate This Week Without Any Coding) automation article — is one of the highest-leverage operational improvements for most solo service businesses. Response time within the first hour of an enquiry significantly impacts conversion. This workflow doesn't solve the problem by sending automated replies (which feel impersonal) — it solves it by having a well-crafted personalized draft ready for you to review and send in two minutes, any time of day.
What you need: Contact form (Google Forms, Tally, or Typeform) + Gmail + Zapier.
Step 1: Create your Zap
Log into Zapier. Click + Create → Zap.
Step 2: Set the trigger
Click the trigger block. Search for your form tool — Tally, Typeform, or Google Forms.
Select your form tool and choose New Entry or New Submission as the trigger event
Connect your account and select the specific form you want to trigger from
Click Test trigger — Zapier will pull in a recent form submission to test with. If you don't have a real submission yet, submit a test entry on your form now, then test
You should see the form fields from your test submission appear. This is the data that will flow through the rest of the workflow.
Step 3: Add the AI step
Click + to add an action step.
Search for "AI by Zapier" and select it. Choose Generate Text as the action event.
In the User Message field, this is where you build your prompt. You're combining static instructions with dynamic data from the trigger. Zapier lets you insert form field values using the blue data pills — click into the field and you'll see the options.
Here's the prompt template to use:
You are drafting a reply email for [Your name], a [what you do]
who works with [your typical clients].

Your tone is [describe your tone — direct, warm, conversational, etc.].
Never use phrases like "I hope this email finds you well",
"please don't hesitate", or "best regards". Sign off with just [first name].

A potential client has submitted the following enquiry:

Name: [insert Name field from trigger]
Message: [insert Message field from trigger]

Draft a personalized reply that:
1. Acknowledges their specific situation or question (shows you read it)
2. Briefly explains how you typically approach this kind of work
3. Suggests a clear next step — either booking a call or asking one
   clarifying question to move forward
4. Stays under 180 words
Replace the brackets with your actual information. For the Name and Message fields, use Zapier's data pills to insert the live form data — click in the field, select the pill icon, and choose the fields from your form trigger.
Leave the System Prompt field with the default or add: "You are a professional email writer for a solo business. Write in a natural, human tone. Never use filler phrases."
Step 4: Save the draft to Gmail
Click + to add another action step. Search for Gmail and choose Create Draft as the action event.
Connect your Gmail account, then configure the fields:
To: Insert the email address field from your form trigger (the lead's email)
Subject: Type something like "Re: Your enquiry" — or use a formula like "Re: [Name]'s enquiry"
Body: Insert the output from the AI step (it will appear as a data pill called something like "Generated text" or "AI output")
Test the step. If everything's configured correctly, a draft will appear in your Gmail drafts folder within a few seconds.
Step 5: Turn the Zap on and test it for real
Click Publish in the top right. Your Zap is live.
Submit a test enquiry through your actual contact form. Wait 1–2 minutes. Open Gmail drafts. A personalized draft should be waiting — written in your voice, addressing the specific enquiry, with a clear next step.
Review it. The first few may need light editing. After two or three real runs, you'll know exactly which parts of the prompt need adjusting — refine the prompt in the Zap's AI step and republish. By the fifth or sixth real draft, most outputs should need minimal editing.
Workflow 2: New calendar event → AI-generated meeting brief → emailed to you
What this does: When a new meeting is added to your Google Calendar matching certain criteria, Zapier triggers, the AI step generates a meeting prep brief based on the event details, and sends it to your email 30 minutes before the meeting. You arrive prepared without having done any manual research.
Why this one second: Meeting preparation — covered in the weekly AI routine — is one of the most consistent time drains in a solo service business. The manual version of this (opening Claude, pasting in context, requesting a brief) works, but requires you to remember to do it and takes 5 minutes each time. This version happens automatically for every qualifying meeting.
What you need: Google Calendar + Gmail + Zapier.
Step 1: Create a new Zap
+ Create → Zap.
Step 2: Set the trigger
Search for Google Calendar. Select Event Start as the trigger event (this fires a set time before an event begins — you can configure the lead time).
Connect your Google account. In Time Before, set it to 30 minutes (or whatever preparation window fits your workflow). Select your calendar.
Test the trigger — it will pull in an upcoming calendar event to work with.
Step 3: Add a Filter step (important)
You probably don't want a meeting brief for every calendar event — a reminder to pick up dry cleaning doesn't need AI preparation.
Click + and add a Filter step. Configure it to only continue if the event title does not contain words like "personal," "block," "lunch," or whatever you use for non-meeting events. Alternatively, filter to only continue if the event description contains a specific keyword you use to tag client meetings.
This keeps the workflow running only on actual client or prospect meetings.
Step 4: Add the AI step
Add another AI by Zapier → Generate Text step.
In the User Message field:
I have a meeting in 30 minutes. Here are the details:

Meeting title: [insert Event Title from trigger]
With: [insert Attendees or Guest Email from trigger if available]
Notes/Description: [insert Event Description from trigger]

I'm a [what you do]. Generate a brief meeting prep note that includes:
1. A one-sentence reminder of what this meeting is likely about
2. Two or three good questions to ask or topics to cover
3. One thing to watch for or be prepared to address
4. The single most important outcome to aim for from this meeting

Keep it under 150 words. No fluff — I'm reading this right before the call.
Step 5: Send it to your email
Add a Gmail → Send Email action.
To: Your own email address (type it in directly)
Subject: "Meeting brief: [insert Event Title]" — use the data pill for the event title
Body: Insert the AI output from the previous step
Test it. You should receive an email with a short, useful meeting brief.
Step 6: Publish and verify
Turn the Zap on. Check that your next qualifying calendar event triggers it correctly. The first run in a real meeting context will tell you whether the AI step's output is useful or needs prompt refinement.
Common adjustments after the first few runs: adding context about who typically appears in your calendar, specifying the format more precisely, or adding a note about your industry so the questions it generates are more relevant.
What to watch for in the first two weeks
Both workflows will need refinement after real use. That's normal — it's the same iteration process as refining prompts in individual AI conversations, applied to an automated workflow.
If the AI output is too generic: Your prompt doesn't have enough context about your business or your clients. Add a sentence describing what you do and who you typically meet with.
If the Zap fails silently: Check the Zap history in Zapier's dashboard — every run is logged with a success or error status. Most failures are field mapping issues (a form field name changed, or the AI step output wasn't connected to the Gmail step correctly).
If the outputs are good but the workflow runs out of Zapier tasks: You've hit the free tier's 100-task limit. Upgrade to Zapier Starter ($19.99/month annual) — at that volume, it's clearly saving you more time than it costs.
Where this leads
These two workflows are the bridge between individual AI use and a genuine AI-supported operation. Once they're running reliably, you've established something important: a workflow that runs in your business without you initiating it. That experience — seeing work happening while you weren't doing it — is what changes how you think about automation.
The next layer from here is connecting more steps: adding a CRM update to the lead response workflow, or adding a follow-up reminder to the meeting brief workflow. That's where the operations and automation content picks up.
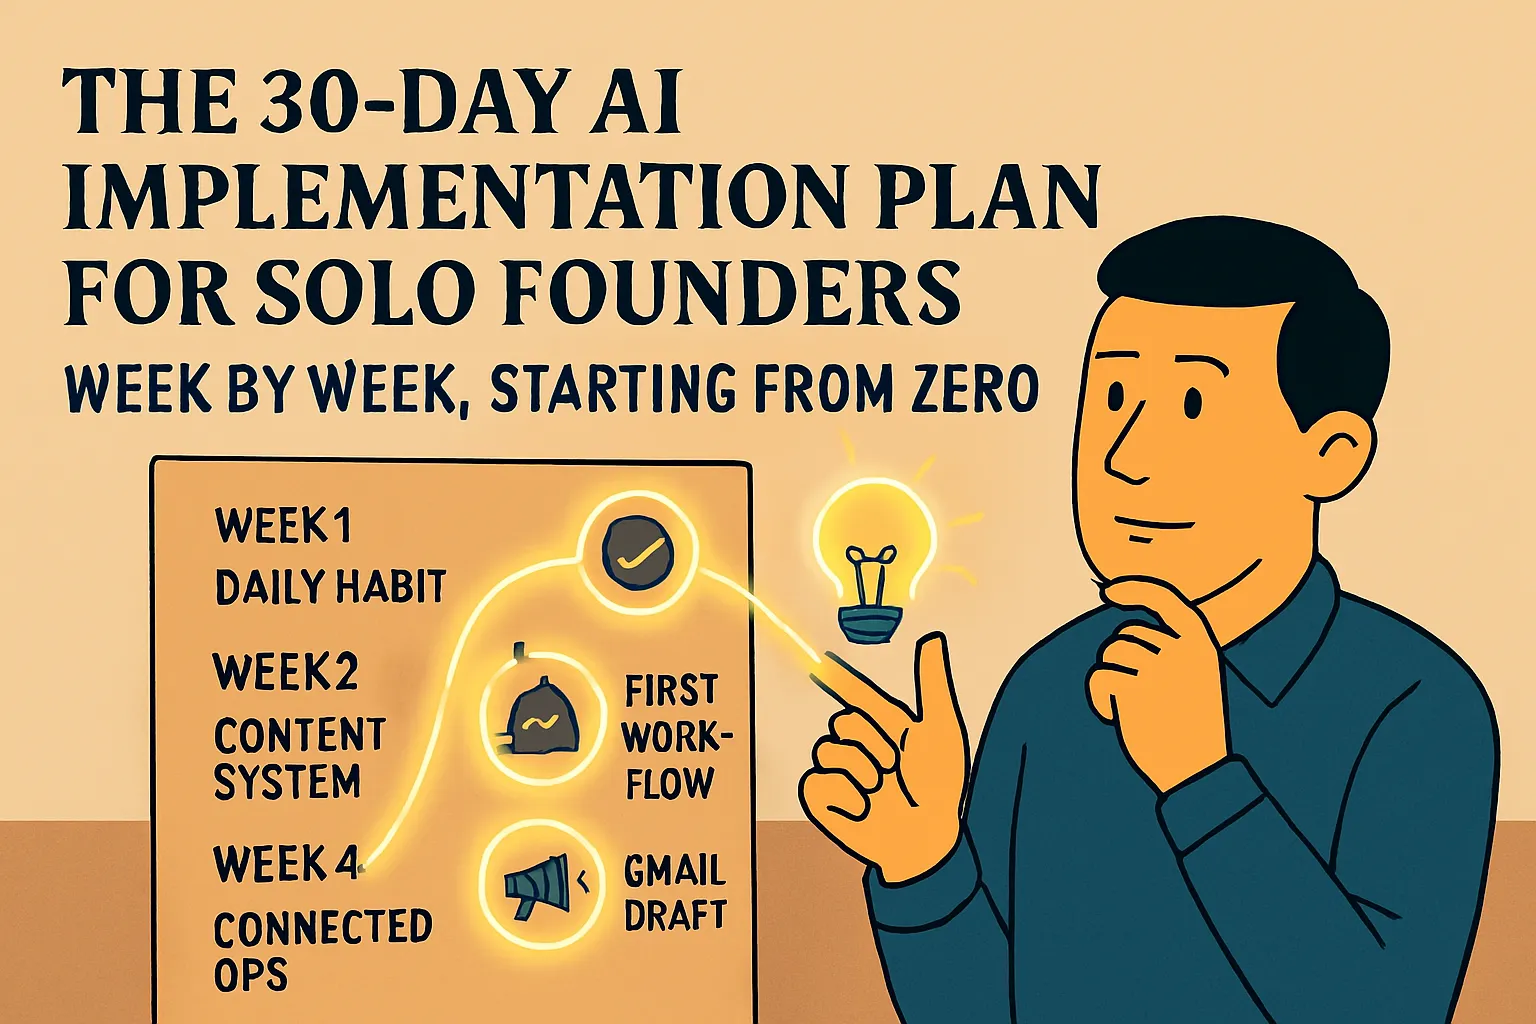
The 30-day AI implementation plan maps out how to sequence these additions without overwhelming yourself. And if you want to understand the full scope of what's possible in automated business operations, the advanced Ops & Automation section is where the more complex workflows live.
Do this today: Pick Workflow 1 — the enquiry response draft. It has the most immediate payoff and the clearest impact on a metric (response time) that directly affects conversion. Set it up, submit a test enquiry, and see your first AI-powered automated draft appear in your Gmail folder. That experience is worth more than any description of how automation works.
Next in Bridge to Intermediate:
How to Build an AI-Powered Content System as a Solo Founder (Start Simple) →
Or step back to: Signs You're Ready to Move Beyond AI Basics →
Or go back to the pillar: ← Bridge to Intermediate


Comments (0)
Leave a Comment